Glenmore to Linn of Dee via Lairig Ghru & Corrour from Aviemore
Cairngorms Walk
Nat Park - Cairngorms - Cairngorm North
County/Area - Highland
Author - John Turner
Length - 21.0 miles / 34.1 km Ascent - 2700 feet / 818 metres
Time - 13 hours 10 minutes Grade - hard
Maps 

| Ordnance Survey Explorer OL57 | Sheet Map | 1:25k | BUY |
| Anquet OS Explorer OL57 | Digital Map | 1:25k | BUY |
| Ordnance Survey Landranger 36 | Sheet Map | 1:50k | BUY |
| Anquet OS Landranger 36 | Digital Map | 1:50k | BUY |
| Ordnance Survey Landranger 43 | Sheet Map | 1:50k | BUY |
| Anquet OS Landranger 43 | Digital Map | 1:50k | BUY |
Walk Route Description
Click image to visit gallery of 9 images.
A long distance route through the Cairngorms over an historic high pass that can be walked as a day-walk. Unless you arrange pick-up at the end of the walk, you will need to leave transport at the Linn of Dee car-park to allow return to Aviemore if required. The car-park has a machine charging £2 for parking, I am not sure if it is compulsory but as we were leaving the car overnight I was happy to pay for the privilege. The walk into Braemar for public transport adds about another 7 miles onto your day. The route should be treated as having tough mountain terrain and it is not unusual for the higher parts of the pass to hold snow well past Easter. There were four in our group and including the detour to Corrour Bothy it took us 10 hours and 15 minutes.
Having deposited a car at Linn of Dee the previous day, we drove around to Aviemore and stayed at the Cairngorm Lodge SYHA overnight. After an early breakfast, we were off on this epic day. We walked up the road towards the Ski Centre until grid ref. NH984073 where our path towards the impressively named Chalamain Gap led off.
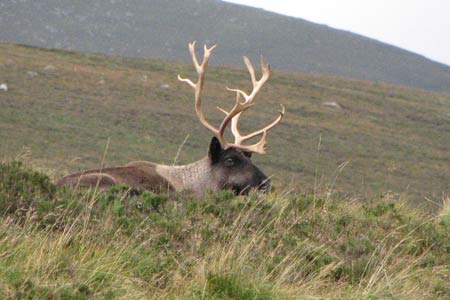
Crossing the footbridge we passed the barn (grid ref. NH982071), which allowed us to see the reindeer herd accommodated there. The path gradually gained height towards the Chalamain Gap. On entering the gap the terrain changes to boulders with the potential to snap some ankles. It is easy enough but care has to be taken. On leaving the Gap, a lot of the previous work to gain height seemed to be negated. We had started the day at the hostel at 340m, gaining the high point of the Gap at 700m - we now lost 110m dropping down to join the Lairig Ghru path proper (grid ref. NH958037) and 590m.
The Lairig Ghru path again gradually climbs up to its high point of 835m (grid ref. NH973012). The weather seemed to worsen as we gained the height to the top, this was an effect of the pass acting as a wind funnel - focusing the wind, cloud and driven rain directly into our faces. Near the summit we used the walled shelter to take a deserved break, shelter and lunch.
After lunch we braved the elements again to drop down to the Pools of Dee, the mountains each side of us remained unseen all day due to the low cloud. Ben Macdui to our left and Braeriach and Carn Toul to our right would have been visible on a nicer day.
Over the high point we gradually descended down the other side of the massif, the walking at times seemed endless but eventually we passed 'The Tailors Stone' (grid ref. NN983965), a group of large but not very high blocks of stone forming an inner sanctum. This was where (the story goes) that two blokes tried to find shelter from a snowstorm when caught out in atrocious weather - they died. Shortly after we were able to deviate off the path to visit Corrour Bothy, we just wanted to have a nosey as some of our group had never seen inside one. The bothy is set near the foot of The Devil's Point or Penis depending on your mood at this time - and was full of people and quite cosy. After its refurbishment it now has an adjoining toilet (for poo only).
When leaving the bothy, do not be tempted to retrace your steps all the way to your original path, this path will lead you to Glen Luibeg (another route to Linn of Dee but not ours). There is a very faint and intermittent path through the boggy ground, yes there is some bog jumping and soggy sections but the path then improves near grid ref. NN984948. The path continues to follow the winding Dee down to the Chest of Dee, a series of small waterfalls and whitewater through narrows. Next you arrive at White Bridge. Do not cross this bridge. You pass it and then follow the paved private track road the 4.7 km or so to Linn of Dee and the finish. A drink in the Fife Arms Hotel bar was called for before driving back round to Aviemore.
Other walks nearby
| Walk 2412 | Craiggowrie & Creagan Gorm from Loch Morlich | mod/hard | 7.3 miles |
| Walk 1904 | Loch Morlich circular (near Aviemore) | easy | 4.0 miles |
| Walk 1605 | Loch an Eilein & Rothiemurchus Forest from Loch Morlich | easy/mod | 10.0 miles |
| Walk 2421 | Braeriach via the Chalamain Gap | hard | 15.0 miles |
| Walk 1881 | Ben Macdui & Cairn Lochan from the Ski Centre | hard | 10.4 miles |
| Walk 2672 | Cairngorm Mountain via Coire an t-Sneachda | mod/hard | 6.0 miles |
| Walk 1390 | Cairn Lochan via the Fiacaill Buttress from Ski Centre | very hard | 5.7 miles |
| Walk 1276 | Loch Avon Circular via Cairn Gorm Mountain | hard | 9.0 miles |
| Walk 2314 | Cairngorm & Ben Macdui from the ski centre | hard | 11.0 miles |
| Walk 1721 | Braeriach via Lairig Ghru | hard | 18.2 miles |
Recommended Books & eBooks
Great Mountain Days in Scotland
 Inspirational guidebook to 50 challenging routes for mountaineers, scramblers, hillwalkers and fell runners, many long enough to backpack over 2 days, especially in winter (12 to 25 miles). A mix of classic routes and unsung gems across Scotland from Galloway to the Outer Hebrides in widely differing wild landscapes. With customised OS mapping.
More information
Walking in Torridon
 This guidebook contains 52 day walks in Torridon, a remote and much-loved area of the Scottish Highlands. Based around Shieldaig and Slioch, the routes are split into 3 sections: easy walks, long and high level walks and mountain ascents over 2000ft including 9 Munros, and 5 outline suggestions for major ridge walks.
More information
Messaging & Social Media
Message Walking Britain and follow the latest news.

Mountain Weather
Stay safe on the mountains with detailed weather forecasts - for iOS devices or for Android devices.